Mini Cakes and Breads

mini-pound-cake-gifts

We have science fair and Valentine’s Day on the calendar this month. A trip to Michael’s Crafts was inevitable. We hit the store yesterday, and after we completed our lap through all of the craft and school supply aisles, a small end cap display with Valentine baking supplies happened to catch my eye. Mini paper loaf pans– with hearts! Does it get any better? Mini + baking + holiday craft all in one.

mini-loaf-pans-package

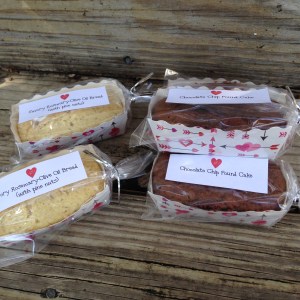
I bought the last two bags of mini loaf pans and immediately came home to make small breads and cakes. I baked this Savory Rosemary and Pine Nut Bread in 12 of the pans and a “faux” chocolate chip pound cake in the other 12 pans I had (recipe below).

mini-bread-and-cake-gifts

We wrapped the mini loaves in 3″ x 4″ clear plastic treat bags and used a twist tie to close. I printed labels for the bags with a small heart motif, and we will be delivering these little treats to my children’s teachers for Valentine’s Day. They make a great teacher gift because they are a single serving and are easy for little people to carry to school and deliver.

mini-cake-size

Chocolate Chip Pound Cake

Ingredients

  • 1 box yellow cake mix
  • 1 small box instant vanilla pudding
  • 1 small box instant chocolate pudding
  • 4 eggs
  • 1 1/2 c. water
  • 1/2 c. vegetable oil
  • 6 oz. chocolate chips

mini-cakes-ingredients

Directions

  • Stir cake mix and pudding mixes together in a large bowl.
  • Add eggs, oil, and water. Beat by hand until smooth.
  • Stir in chocolate chips. You can coat the chocolate chips with about 1/2 T. flour before adding to the batter to keep them from sinking to the bottom during baking. If you are making mini sized cakes, use mini chocolate chips.
  • Pour into a greased and floured bundt pan. If you are using the mini paper loaf pans, you do not need to grease or flour the pans. You will fill the mini pans about halfway.
  • Bake 1 hour at 350 degrees or until a skewer inserted in the center comes out clean. If baking the mini size, reduce baking time to ~30 minutes.
  • Cool 20 minutes and remove from pan. If using the mini pans, leave in the paper pans.

mini-cakes-filling-loaf-pans

Notes

  • The mini paper loaf pans can bake in a temperature up to 400 degrees. They do not need to be greased. To get your bread or cake out of the little pan, you unstick the corners and pull the sides away when serving.

mini-cake-side-view

A Hankering for Pie

strawberry pie slice

Recently, I became unafraid to make pie crust from scratch. It happened when Miss Priss I needed to bake a pie after she won a persuasive writing contest at school. We had to bring in the pie she described in her essay for a class pie tasting. I put off making the pie until the last minute– as in really late the night before it was due– and I was forced to make a homemade pie crust since I could not get to the grocery store at that late hour to buy a pre-made one. Turns out, they are not that hard to make, and you really do notice a difference. I’ve tried a few different recipes and prefer the crust recipes that use Crisco as opposed to butter (see links below).

sugar and cream pie slice

Miss Priss’ winning pie was a Chocolate Brownie Drizzle Pie from Paula Deen. Tonight we are having Strawberry Pie and last week (in honor of Pie Day) we ate this Sugar and Cream Pie that was heavenly.

Strawberry Pie Ingredients

  • 1-2 pints fresh strawberries, stems and leaves removed
  • 3/4 c. water
  • 3 T. cornstarch
  • 1 c. sugar
  • 1 t. fresh lemon juice
  • 1 t. lemon zest
  • 1 9-in. baked pie shell
  • 1/2 pint whipping cream, whipped

Directions

  • Cut 1 pint strawberries into bite sized pieces and line the bottom of the baked pie shell with the strawberry pieces. I quartered the strawberries and dropped them into the crust, but you could slice them and place the slices evenly around the shell to make the pie more decorative.
  • In a saucepan, bring to a boil 6-8 whole strawberries with 3/4 c. water. Simmer for 3-4 minutes.
  • Combine cornstarch and sugar and add to the berries.
  • With a whisk, stir constantly until the mixture is clear and thickened. Pour thickened strawberry mixture through a sieve to remove any chunky pieces.
  • Add lemon juice and lemon zest to the strawberry liquid.
  • Pour liquid over the strawberries in the pie shell. Chill several hours.
  • Serve topped with whipped cream.

strawberry pie

Notes

  • If you do not chill the strawberry pie long enough, the strawberry syrup will be runny and not hold together when you slice the pie. This does not affect the taste of the pie, but it looks pretty messy.
  • The original Crisco pie crust recipe can be found HERE. I use milk in place of the water.
  • Pioneer Woman has a good Crisco pie crust recipe HERE.

pie crust transfer

Cookie Decorating Party

cookie party pipe and flow

Last summer, we visited a newly opened cookie and cake decorating shop in St. Louis while visiting Sewing Sister. Sweetology had a wall of sprinkle choices, an entire counter for mixing icing colors, and shelves full of tools and cutters for creating shapes to decorate pre-baked cookies, cupcakes, and cakes. It was dessert decorating heaven.

Sweetology Cookies and Cupcakes

Sweetology Cookies and Cupcakes

Miss Priss wanted a cooking birthday party of some kind– preferably a party with lots of icing and sprinkles. I briefly toyed with the idea of hosting at home but then began scouting cupcake and cooking locations. I started by calling our local cupcake shops who offer party packages, but I learned that the party’s primary activity is mixing the batter and baking cupcakes. We wanted to spend more time actually decorating.

I finally called the Southern Season cooking school near our home, and they worked with me to organize a party with pre-baked cookies and lots of decorating. The staff at our party showed us a pipe and flow technique, so everyone got to use piping bags (so fun) and they offered a variety of decorating materials to top the icing too.

cookie party invitation

The Invitation: I like paper invitations. I am about the only mom who still sends invitations via USPS, but choosing an invitation is one of my favorite parts of planning a party. I found lots of cute invitation options with a cooking or cupcake theme, but it was harder to find an invite with a cookie design. I finally found This Invitation on ArtFire.com. The owner e-mails a proof and then prints the paper invitations and mails them the day after the sample is approved. It is a home business, and it took over a week (8 days) to receive the proof (her store site states she will send a proof in 3 business days). The owner replied to my e-mail inquiries, but the turnaround was too long for my OCD tastes.

cookie party icing supplies

The Cookies: The cooking school had a long table covered in white paper. They had various bright colored icing in piping bags and “looser” icing in plastic containers. They provided small plastic spoons and toothpicks to help with the icing distribution. There were 5 pre-baked sugar cookies in fun fall shapes at each place. The girls received a short demo about how to pipe a design using the piping bags and “tighter” icing.

cookie party icing cookies

They needed to wait a few minutes for the piped icing to set. Then, the guests spooned small amounts of the loose icing into the open spaces on the cookie and spread it gently into the nooks and crannies. As a final touch, the kids could add sprinkles. I forgot to ask what type of icing we used, but I think it was probably royal icing since it hardened pretty quickly.

cookie party thank you favor

The Party Favors: The cookie school had clear plastic boxes to transport any uneaten cookies home. I printed business card sized Cookie Party Favor Card Inserts on card stock and put them in small reclosable bead storage bags (3″ x 5″) I purchased at Michael’s Crafts. Miss Priss added 1 t. of jimmie sprinkles and 1 t. of nonpareil sprinkles to the baggies. It looked like edible confetti! We added one little baggie of sprinkles to each box of cookies. The cooking school distributed a copy of the sugar cookie recipe too.

cookie party thank you favor finished

The Time: We booked the party for 2 hours, but 90 minutes would have been perfect. The girls decorated every cookie Southern Season had, and we still had 30 minutes left before parents arrived. I ended up siting on the floor with our group and playing games like Telephone and the Grocery Store Memory game because a dozen 2nd grade girls who have just eaten boatloads of sugar and have nothing to do is a deadly combination. I actually had to tell several of them to stop licking the table.

cookie party cookie box

The best part of the party was the clean-up. None for me! If you plan a cooking party of some kind, do not try this at home. Outsourcing this party was the best decision I made. If your child would like a cooking birthday, start with the cupcake stores in your area. Almost all of the cupcake shops near me had private event options. Have you hosted (or attended) a cooking party of some kind? What worked well and what did not?

cookie party finished cookies

Houseguests

pound cake slice

Aunt B arrived yesterday with her two boys. Sewing Sister arrives tomorrow with her girls. I will have a full house for the next few weeks. Since I live near the beach, we have houseguests during the summer fairly regularly. I have systems and procedures for everything much to the frustration of TheRoomDad. In order to get ready for any friends and family who may be visiting, there are a few houseguest preparatory measures I follow.

  1. I collect hotel shampoos and lotions throughout the year, travel toothpastes from dentist visits, and Christmas toothbrushes and keep them in a special “guest” drawer in our bathroom that people can use when they visit.  Guests are welcome to use any of the toiletries. I also keep an extra hair dryer in the bathroom for guests.
  2. I have a secret addiction to junky magazines like Us and In Touch. After reading an issue, I will keep a stack in our spare room. Guests are welcome to read them when they visit. I keep a stack of paperback beach reads in the room too.

houseguest magazines

  1. I stock the refrigerator with “group food”, so people can serve themselves a little bite at any time. Some of my favorite items to have on hand are DILL DIP and BLACK BEAN SALSA DIP. I thrive on party food and love to make it. I am not sure why it is so different from the day to day monotony of preparing family meals (which I dread), but it is. I find that food preparation and kitchen maintenance are the hardest pieces to manage when guests are in town.

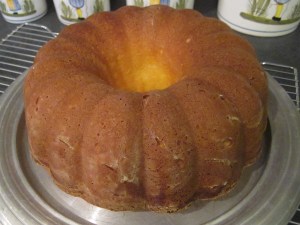
For this particular family visit, I baked a pound cake, which is one of Aunt B’s favorites. I think this is kind of a traditional version of pound cake because if you Google “cream cheese pound cake” you get many results with the exact recipe that I use. I have been having problems with my Bundt pan, but I finally just threw the thing away and bought a new cake pan. Success! The pound cake turned out perfectly.

Most recent baking attempt with the old Bundt pan. This should have been a glazed lemon cake.

Most recent baking attempt with the old Bundt pan. This should have been a glazed lemon cake.

Pound Cake

Ingredients

  • 3 sticks butter, softened (1 1/2 cups)
  • 1 8-oz. package cream cheese, softened
  • 3 c. sugar
  • 6 eggs
  • 2 t. vanilla
  • 3 c. flour, sifted

pound cake mixer

Directions

  • Preheat oven to 325 degrees.
  • Blend butter and cream cheese.
  • Add sugar until well mixed.
  • Add eggs one at a time and then vanilla.
  • Add sifted flour slowly.
  • Put mixture in greased and floured Bundt or tube pan.

pound cake batter in pan

  • Bake for 1 1/2 hours. Remove from the oven and let sit for ~5 minutes.

pound cake baked

  • After the cake rests for a few minutes, hold a cake plate on top of the Bundt pan and turn over, so the cake will drop into the middle of the cake plate. Let the Bundt pan stay on the top of the cake until you can see that the cake has dropped onto the cake plate.

pound cake finished Notes

  • To grease and flour a Bundt pan, cover the inside of the pan completely with Crisco. Scoop about 1/4 c. flour into the bottom of the pan. Holding the pan over a sink, roll (and tap) the pan around on its side letting the flour stick to all parts of the Crisco.

pound cake flouring pan

pound cake floured pan

  • Make sure that you turn the cake out of the pan while it is warm. This will help make the layer that sits on the cake plate squish down a little and be crispy and moist at the same time. That bottom portion of each slice is TheRoomMom family’s favorite bite of cake.

pound cake cross section

What strategies do you have for overnight guests, or do you just book a hotel room?

Teacher Appreciation Idea with a Twist

rosemary bread teacher gift

In my last post, I shared a banana bread recipe baked in mini loaf pans that I wrapped up to give as teacher appreciation gifts. Most people have a family banana bread recipe, so it is not that new and exciting. I was thinking it might be a nice twist to bake a breakfast bread recipe that may not be as widely recognized. I pulled out a recipe I have for Rosemary-Olive Oil Bread because I needed a few more teacher sirsees this week. This is a savory bread, and a slice tastes REALLY good toasted.

rosemary bread sliced

Ingredients

  • 2 1/2 c. all-purpose flour
  • 3/4 c. sugar
  • 1/2 c. pine nuts
  • 2 t. baking powder
  • 2 t. dried rosemary
  • 1/4 t. salt
  • 1 T. freshly grated lemon zest (about 1 lemon)
  • 2 eggs, lightly beaten
  • 3/4 c. apple juice
  • 1/2 c. extra virgin olive oil
  • Pam or Crisco
  • standard loaf pan (8″x 4″) or 3 mini loaf pans (5 3/4″ x 3 1/4″)

Directions

  • Preheat oven to 350 degrees. Lightly coat loaf pan with vegetable cooking spray or grease the pan with Crisco.
  • In a bowl, stir together the flour, sugar, pine nuts, baking powder, rosemary, salt, and lemon zest.

rosemary bread dry ingredients

  • In another bowl, blend the eggs, apple juice, and olive oil. Stir the wet ingredients into the dry ingredients.

rosemary bread dry and wet ingredients

  • Transfer the batter to the loaf pan and smooth the surface.

rosemary bread pan

  • Bake 55 minutes or until a skewer inserted in the center comes out clean.

rosemary bread baked

Notes

  • The pine nuts can be replaced with chopped walnuts or pecans. You can also use a combination of nuts if you only have a 1/4 cup of pine nuts and need to add a few pecans to make 1/2 cup. This combination has been tested and approved.
  • If using mini loaf pans, fill about halfway with batter. I get about 3 mini loaves per recipe. Reduce the cooking time for the mini size. After about 30 minutes, watch until the top is browned, then test the center to determine if the rosemary bread is baked through.
  • Wrap with parchment paper and have kids decorate with stickers to give as gifts.
  • These work well as a teacher appreciation gift, hostess gift, or housewarming present.

rosemary bread cooling