Homemade Cheezits (kind of)

cheese-crackers-gift-bags-front-and-back-2

It’s holiday teacher gift season! I love teacher gift ideas, and I try not to repeat too many ideas from year to year. If I were not a teacher and a parent, I would not take the teacher gift situation so seriously, but I know how much I appreciate getting a small thank you from a student or family at the holidays, so I try to do the same for my children’s teachers. At the holidays, I often receive lots of home baked sweet goodies (no complaints here). Because there might be lots of cookies and candies on the way, I thought I would go the savory route for this year’s teacher gifts.

cheese-crackers-close

The crackers look like a Cheezit and have a similar taste but are slightly more gourmet due to the rosemary. I found THIS RECIPE via Pinterest. The recipe is easy to follow, but it is time consuming since you need to mix the dough, let it rest in the refrigerator, roll out the dough, cut, and bake. I put about 2/3 cup of crackers in each gift bag and ended up making three batches of dough to have enough crackers (twelve teachers).

cheese-crackers-cutting-shapes

In order to make my cuts even for the cracker shape, I cut a strip of cardstock paper one inch wide and used that as a guideline for cutting. I had straggly edge pieces that were not perfect shapes, and those were the pieces we ate at my house!

cheese-crackers-gift-bags

I printed labels on Avery 8163 shipping labels (2″ x 4″). You could use this ROSEMARY CHEESE CRACKER LABEL template and print on regular paper, cut, and tie to the bags with curly ribbon. The crackers would also be pretty in pint Mason jars or small, decorative Chinese food container boxes.

cheese-crackers-cooling

I am hoping the teachers receiving these little gift bags will enjoy this snacky treat. For our teachers who we know are dog owners, we are giving these DOG TREAT GIFT BAGS in place of the human treat. It saved me having to make even more batches of crackers!

cheese-crackers-gift-bags-front-and-back


Teacher Gift Card Boxes

teacher gift card boxes finished

New craft tool + end of the school year = excessive amounts of time designing an end of year teacher gift for the faculty members and staff at our school who work with my children all year. I found THIS VIDEO on YouTube to make small gift boxes using cardstock paper and got busy. First, I needed a new paper cutter tool that also had the option for scoring paper (highly recommend!). Next, I fiddled with the box proportions to come up with a size that would hold a giftcard, or in our case, scratch off lottery tickets. Finally, I spent many hours cutting and folding boxes with coordinating colors and patterns. Time well spent in my opinion– not so much for the rest of my family.

To see more DIY envelope type crafts to hold gift cards for teacher gifts (or any person) click HERE and HERE.

teacher gift card boxes

Materials

  • paper cutter with paper scoring tool as well (I have THIS ONE)
  • cardstock paper in various colors
  • double sided tape in an E-Z dispenser, .27″ width (like THIS)
  • Elmer’s glue
  • Washi tape or stickers to close flap

teacher gift card boxes supplies

Directions

  • Watch THIS VIDEO to get the hang of folding the boxes and attaching the sides and flap.
  • Each box with flap needs two pieces of paper. The box paper is 4″ x 8 1/4″. The flap paper is 8 1/2″ x 3 1/4″.
  • Place the box paper (4″ x 8 1/4″) landscape direction on the paper cutter and score lines at 4″ and 4 3/8″. Turn the paper portrait direction and score at 3/8″ and 3 5/8″.

teacher gift card boxes make score lines

  • Place the flap paper (8 1/2″ x 3 1/4″) landscape direction and score lines at 4 1/2″ and 4 7/8″.
  • Fold along all of the scored lines and using the scoring tool or a dull edge, press the folds to make them crisp.

teacher gift card boxes fold on scores

  • On the paper that will become the box, cut 3/8″ into the center on the folds that are near the middle of the paper. Then cut a small triangle out of the paper, so you have center flaps that can tuck into the box when you fold up the sides.

teacher gift card boxes score lines

  • Place the box paper flat on your work surface. The side of the paper that will become the outside of the box should be facing up. Run a strip of double sided tape along the edge flap of the bottom half of the box.

teacher gift card boxes double sided tape

  • Fold the little triangle notches into the center and then fold the box together. Carefully press the non-taped side strip onto the taped side strip to form the box. Put the attached sides of the box on a flat surface and press/rub the scoring tool inside the box along the taped edges to stick the sides together firmly.

teacher gift card boxes folding

  • Line up the flap along the back of the box. The shorter edge of the flap should come over the top of the box. With a light bead of Elmer’s glue, run a little across the back of the box and attach the flap making sure the edges line up evenly.

teacher gift card boxes attach flap

  • Let the glue dry. Fill the box and then close flap with a piece of Washi tape or a sticker.

teacher gift card boxes empty

Notes

  • The finished box is ~3 1/4″ wide x 4 1/2″ tall x 1/2″ deep. You can make the boxes bigger or smaller by playing with the original paper sizes.
  • We added a square of cardstock (2 3/4″ x 2 3/4″) to the front of our flap to be able to write a note.

teacher gift card boxes sample

End of Year Teacher Gift

paper pockets finished all

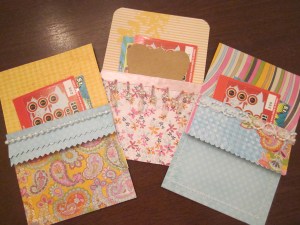
Not too long ago, I found pictures of Gift Holding Cards made with scrapbook paper. I filed the idea away knowing I could do something along the same lines in the near future. Miss Priss and Mr. Star Wars wanted to give scratch off lottery tickets as end of year teacher gifts again (mostly because they know they get to scratch any leftovers), and I have spent three days engineering my own gift holding cards to hold the lottery tickets.

paper pockets supplies

I used scrapbook paper and located all of the various trim, ribbon, sequins, and embellishments I have from American Girl projects. I dug out craft scissors with the decorative edges and my fancy hole punchers. You can really use any kind of decorative materials you have on hand (stamps, stickers…).

paper pockets prep

Cut two coordinating pieces of paper to 4″ x 6″. Fold one piece over about 2/3 of the way along the 4″ side and press firmly to crease. I first sewed the folded piece and any front trim together along the folded edge before attaching to the back piece. I then stacked the two pieces together, lining up the edges, and sewed around the outside to attach the folded piece of paper to the back leaving the top of the pocket open. If you don’t sew, double sided adhesive roller tape along the edges would work too, but I must tell you, sewing paper is super fun.

paper pockets finished set 1

We filled our gift pockets with the lottery tickets and slipped a small handwritten note in the front of the pocket. The pockets also fit gift cards. I think they would be a pretty way to deliver a thoughtful note too. The Original Blog Post with the pocket idea had single fancy tea bags in the pocket.

paper pockets finished set 2

paper pockets finished set 3

paper pockets finished set 4

Coaches’ Gift

gift card pouch finished and filled

Because I work at the school my children attend, I am not allowed to volunteer to be the roommom, which would then give me control over any gifts the group might choose to give to the teacher. It is a conflict of interest. I actually think I would be the best person for the job since I have all kinds of insider information on what makes a good teacher gift *sigh*. So, to fill the void, I volunteered to collect the money for our end of season gift to our summer swim coaches. I helped out last year by donating the Swim Emergency Kit that held a cash gift and other items a coach might need in his/her swim bag.

gift card pouch finished

We are giving the coaches cash again, and I needed a vehicle to deliver the money because a plain ol’ envelope is not that much fun. I found This Pattern for a business card holder. I thought it could easily be adapted to hold cash or gift cards, so I made a supply list and headed out to buy fabric in our team colors. I made a whole fleet of little gift card holders. We have four coaches, and I also made extra for teacher gifts this year because I always give a gift card to my kids’ teachers at some point during the year.

Materials (for one gift card holder)

  • 1 piece of fabric measuring 4 1/2″ x 6″
  • 1 piece of fabric measuring 4 1/2″ x 3″
  • 1 piece of fusible web measuring 4 1/2″ x 6″
  • 1 piece of fusible web measuring 4 1/2″ x 3″
  • pinking shears (very sharp)
  • iron
  • sewing machine

gift card pouch fusible web fabric

Directions

  • Apply each piece of fusible web to the wrong side of the piece of fabric that is the matching size. Iron the fusible web into place (follow the directions that come with the fusible web).

gift card pouch fusible web

  • Fold the larger piece of fabric in half making it 4 1/2″ x 3″ and iron until the folded edge of the fabric is pressed well, and the two pieces lay flat together.

gift card pouch finished fabric pieces

  • Cut around all 4 sides of the double layer of fabric with the pinking shears. Make sure the the two layers of fabric stay even and do not shift (pin together if needed).
  • Cut around all 4 sides of the single piece of fabric with the pinking shears. Cut 1″ from the end of a side that is 3″, so the gift card will be able to peak out of the top.

gift card pouch pinking shears

  • Lay the shorter single piece of fabric on top of the double piece of fabric and even up the edges. Pin into place and sew around the outside edge using a straight stitch and a 1/4″ seam allowance.

gift card pouch sewing start

  • Start and end the stitch at the top of the pouch, so the fabric will stay flatter and be less likely to pucker.

Notes

  • The original directions on the Going Home to Roost website used a double sided fusible webbing, which I could not find. I adjusted my construction to make the single sided webbing work.
  • I wanted to cut the zig zag edges once the holders were sewn together, but my pinking shears could not get through all of the layers of fabric. It works better to cut the two separate layers before sewing, and you still need really sharp scissors. Amazingly, the zig zags line up pretty easily when it is time to sew the front and back together.
  • The holders are the perfect size for business cards, store loyalty cards, gift cards, and cash.
  • I tried a few with coordinating fabrics, but I much prefer the look of all one fabric for the front and back.

gift card pouches finishedWhat are other good ways to deliver gift cards that are a little more personal than a paper envelope?

Paper Pockets

paper pockets tied

Awhile ago I found This Pin for paper pouches that could be used for party favors or little sirsees. It was an easy sewing project (only required one straight sewn edge) and even had the option to assemble without sewing. The pockets reminded me of May Day baskets, and I knew they were a crafty RoomMom idea waiting to happen, so I saved the pin for a rainy day.

paper pocket w lottery ticketsToday is the rainy day. It turns out the paper pockets are just right for scratch off lottery tickets, which I deemed the 2014 end of year gift idea for all of the teachers and support staff at school who work with my Mr. Star Wars and Miss Priss. I purchased a big stack of $1 scratch off lottery tickets and filled the little envelopes. My kids added Avery 8163 Thank You Gift Labels that I printed and signed their names. We hole punched and tied the end with curly ribbon. The Original Post with the paper pouch directions had a different suggestion for sealing the end closed.

paper pockets materials

Materials

  • scrapbook paper pieces (6″ x 7″)
  • double sided adhesive roller (I used Scotch brand)
  • hole punch
  • curly ribbon
  • Avery white shipping labels (#8163– 2″ x 4″)

Directions

  • Using a paper cutter (essential), cut scrapbook paper into 6″ x 7″ pieces.
  • Using the double sided adhesive roller, place a sticky strip down two adjacent sides of the paper. There will be tape down a 6″ side and a 7″ side, and they will meet at the corner.

paper pocket adhesive directions

  • Roll the paper up to look like a toilet paper roll with the 6″ sticky side on the outside of the roll. Carefully make sure the edges line up straight. Press the 6″ side, so it sticks to the length of the side of paper beneath it forming the roll.

paper pocket rolled

  • The inside of one end of the roll will have the remaining sticky edge exposed. On a hard surface, press the edge down flat sealing the end closed.

paper pockets pressed end

  • If desired, sew a zig zag stitch along the pressed end leaving a 3/8″ seam allowance. Backstitch at the beginning and end, so the thread does not unravel. The sewn edge adds detail to the pocket but is not necessary.

paper pockets sewing

  • As an additional decorative edge, you can cut with craft scissors to add a scalloped border. My (crappy dull) craft scissors did not cut through two layers of paper well, and I ruined some of my ends.

paper pockets fancy edge

  • Gently press the pocket flat and attach a label to the front.
  • Hole punch the center of the open end.
  • Fill with treats.
  • Tie curly ribbon through the hole and use scissors to curl.

paper pockets pile

Alternate Finish

  • Do not press flat after sewing the one ending closed.
  • Fill with treats.
  • Holding the pocket with the closed end flat on the table, pinch the opening closed the opposite direction (up and down) and press the corners slightly.

paper pocket closed

  • Roll a little adhesive in the center of the open top and press firmly.
  • Sew (or use more adhesive) to finish closing.

paper pockets sewn closed

I know you are probably thinking, “Her teacher gift label should say ‘I am so lucky to have had you as a teacher this year’ since it would go so well with a lottery ticket and that is what everybody on Pinterest would do.” I just don’t do play-on-word notes.

5 more days of school where I work! Bring on summer…