No Bake Recipes

cookie dough bar

Miss Priss has been on a cooking bender. I think she fancies herself a future Chopped Junior contestant. I was getting tired of monitoring the kitchen with her, so we moved over to no-bake recipes. I don’t have to be by her side the whole time, and she still experiences all of the joys of cooking. She is also gaining measuring skills, the ability to read and follow directions, and learning how to clean up after herself (my favorite side benefit). She has no idea she is actually learning these valuable skills, and I am not planning on revealing this little secret.

cookie dough bars sliced

The best recipe she has made so far is a chocolate chip cookie dough ice cream bar. I found the original recipe and directions HERE. I helped cut the parchment paper to the correct size, and I licked the bowl, but other than that, I had no involvement.

Directions

  • Prepare the eggless cookie dough batter (CLICK HERE for recipe).
  • Line a 9 x 9 pan with 2 pieces of parchment paper strips. Put one strip horizontally across the pan and the other strip vertically. The ends of the strip should hang over the edges of the pan. This will allow you to lift the frozen cookie dough out of the pan later.

cookie dough bars first layer

  • Press half of the cookie dough into a thin layer on the bottom of the parchment paper lined pan.
  • Put two new strips of parchment paper over the layer of cookie dough and gently press and smooth the paper. Spray lightly with Pam or another cooking spray.
  • Press the other half of the cookie dough on the second layer of parchment paper into a thin layer.

cookie dough second layer

  • Fold the parchment over the top and put a weight on top to hold the parchment paper down (you could use a tupperware/bag of dried beans, bag of frozen vegetables, or something else in your freezer).

cookie dough weight

  • Freeze for 2-3 hours.
  • Gently remove frozen cookie dough layers from the pan and peel from the paper.

cookie dough removing layers

  • Put two of the strips of parchment back in the pan and gently place one cookie dough block back on the paper in the pan.
  • Gently spread one quart of softened ice cream over the cookie dough base.

cookie dough spreading ice cream

  • Place the second cookie dough block on top of the ice cream.

cookie dough bars assembled

  • Cover with a strip of parchment. Place a weight on top (dried beans or bag of frozen vegetables again) and put back in the freezer for 2-3 hours.
  • To serve, lift the cookie bars out of the pan using the bottom layer of parchment paper as a handle. Cut into squares with a sharp knife. Running the knife under hot water before using it to cut will help make slicing easier. OK– so I helped with this step too, and the cookie dough “crust” breaks very easily.

cookie dough bars frozen

Reasons to Cook with Kids

  • Math skills– fractions, adding, dividing, proportions…
  • Science skills– heat and temperature, changing states of matter
  • Procedures and directions– following step by step directions and seeing the cause and effect if you go out of order (or stay in the order of the recipe), developing patience and waiting for results
  • Reading– recognizing and reading a recipe format as compared to non-fiction text or chapter books
  • Screen free– no devices required

cookie dough ice cream bar

Tortellini Pasta Salad

tortellini pasta salad serving

A new gourmet olive oil shop opened in town, and I had two sweet students bring me bottles of balsamic vinegar and olive oil at the end of the school year. The olive oil is that really good kind that tastes good all by itself with crusty bread dipped in it, which was my main plan until we needed a side dish for TheRoomDad’s latest grilling adventures. I whipped together an easy tortellini pasta salad that is delicious and summery and excellent with steak.

tortellini pasta salad olive oil dressing

Ingredients

  • 1 family sized package cheese tortellini (~1 lb)
  • 1/4 c. extra virgin olive oil
  • 2 T. balsamic vinegar
  • 1 T. kosher salt
  • freshly ground black pepper (to taste)
  • 6 slices bacon, cooked and crumbled
  • 1 handful baby arugula
  • 1/2 c. sun-dried tomatoes, chopped
  • 1/4 c. Parmesan cheese, shredded (or to taste)

tortellini pasta salad mixing

Directions

  • In a large pot of salted boiling water, cook tortellini according to package directions. Drain and transfer to a large serving bowl. Add a little drizzle of olive oil to the pasta and toss gently to keep the tortellini from sticking together and let cool slightly.
  • In a separate dish, whisk together olive oil, balsamic vinegar, kosher salt, and pepper.
  • In the bowl with the tortellini, add crumbled bacon, spinach, sun-dried tomatoes, and dressing. Toss well until the tortellini is coated with dressing. The arugula will wilt slightly.
  • Sprinkle Parmesan on top before serving.
  • Serve at room temperature.

Notes

  • I have not officially tested this, but I think the pasta salad would travel well to tailgates and potlucks and could be refrigerated.

tortellini pasta salad finished

A Hankering for Pie

strawberry pie slice

Recently, I became unafraid to make pie crust from scratch. It happened when Miss Priss I needed to bake a pie after she won a persuasive writing contest at school. We had to bring in the pie she described in her essay for a class pie tasting. I put off making the pie until the last minute– as in really late the night before it was due– and I was forced to make a homemade pie crust since I could not get to the grocery store at that late hour to buy a pre-made one. Turns out, they are not that hard to make, and you really do notice a difference. I’ve tried a few different recipes and prefer the crust recipes that use Crisco as opposed to butter (see links below).

sugar and cream pie slice

Miss Priss’ winning pie was a Chocolate Brownie Drizzle Pie from Paula Deen. Tonight we are having Strawberry Pie and last week (in honor of Pie Day) we ate this Sugar and Cream Pie that was heavenly.

Strawberry Pie Ingredients

  • 1-2 pints fresh strawberries, stems and leaves removed
  • 3/4 c. water
  • 3 T. cornstarch
  • 1 c. sugar
  • 1 t. fresh lemon juice
  • 1 t. lemon zest
  • 1 9-in. baked pie shell
  • 1/2 pint whipping cream, whipped

Directions

  • Cut 1 pint strawberries into bite sized pieces and line the bottom of the baked pie shell with the strawberry pieces. I quartered the strawberries and dropped them into the crust, but you could slice them and place the slices evenly around the shell to make the pie more decorative.
  • In a saucepan, bring to a boil 6-8 whole strawberries with 3/4 c. water. Simmer for 3-4 minutes.
  • Combine cornstarch and sugar and add to the berries.
  • With a whisk, stir constantly until the mixture is clear and thickened. Pour thickened strawberry mixture through a sieve to remove any chunky pieces.
  • Add lemon juice and lemon zest to the strawberry liquid.
  • Pour liquid over the strawberries in the pie shell. Chill several hours.
  • Serve topped with whipped cream.

strawberry pie

Notes

  • If you do not chill the strawberry pie long enough, the strawberry syrup will be runny and not hold together when you slice the pie. This does not affect the taste of the pie, but it looks pretty messy.
  • The original Crisco pie crust recipe can be found HERE. I use milk in place of the water.
  • Pioneer Woman has a good Crisco pie crust recipe HERE.

pie crust transfer

7-Layer Dip

7 layer dip finished

Watching football this weekend? Attending a family friendly New Year’s Eve party? Me too. There is no better tailgate snack food for football watching and potlucks than a Mexican 7-layer dip. I will be bringing this crowd favorite to a friend’s house tonight, and I made individual sizes, so we can keep eating more dip during football games tomorrow. Normally, I like to use a layer of diced tomatoes instead of salsa. I forgot the tomatoes at the grocery store, so I went with the salsa layer, which is a totally acceptable substitute. You can see my original recipe with the diced tomatoes HERE. I know many people have a version of this recipe, but I think the Fritos Original Bean Dip and the taco seasoning mixed in with the sour cream makes this variation a little special. Happy New Year!

Ingredients

  • 2 (9-oz) cans Fritos Original Bean Dip
  • 1 container guacamole (about 10 oz.)
  • ~2 cups salsa
  • 1 pkg mild taco seasoning
  • ~12 oz. sour cream
  • 2 c. Mexican cheese blend, grated
  • 3 green onions, chopped
  • scoop Frito’s or tortilla chips

Directions

  • Scoop the 2 cans of bean dip into a 9 x 13 casserole dish and spread evenly across the bottom with a spatula.
  • Dollop the guacamole on top of the bean dip and gently spread out using the spatula. Try not to disturb the bean dip layer. It’s kind of like frosting a cake.

7 layer dip guac

  • Dollop the salsa on top of the guacamole layer and spread gently.

7 layer dip salsa

  • In a small bowl (or the sour cream container), mix the taco seasoning with the sour cream. Combine well. It will be a light orange color. Spread the sour cream mixture over the guac and salsa. Gently spread with the spatula trying not to disrupt the layer beneath.

7 layer dip sour cream

7 layer dip sour cream layer

  • Sprinkle the grated cheese on top.
  • Sprinkle the green onions over the cheese.
  • Serve with Frito scoops or tortilla chips.
  • Can be made ahead. Cover and refrigerate until ready to serve.

Notes

  • Make individual layered dips in ramekins or the clear 9-oz. plastic cups.

7 layer dip individual

Vanilla Sugar

vanilla bean flavored sugar

I have been agonizing over holiday teacher gifts again. Each year I need at least a dozen small gifts for all of my children’s teachers. It is not something I have to do. It is something I like to do. I know how much I appreciate the gifts my students give me at Christmas, so I like to do the same for the teachers my children have. I spend a lot of time finding something that is affordable yet (hopefully) useful.

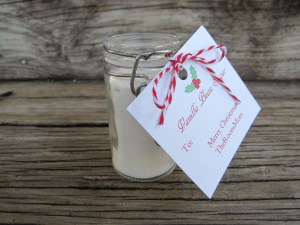
This year, I mass produced flavored sugars in small jars. Almost all teachers I know drink coffee on a daily basis, and while they don’t need a coffee mug, I thought they might like a coffee “mixer”. The sugar has a little gourmet twist to it with the vanilla bean flavor, and the gift is consumable. Teachers won’t have to store or care for it once it is used. I made extra jars to use as hostess gifts or little sirsees for neighbors.

vanilla bean sugar jar label

Ingredients

  • 2 c. sugar
  • 1 whole vanilla bean

Directions

  • Put 2 cups sugar in a mixing bowl
  • On a cutting board, split the vanilla bean in half and scrape the seeds from the inside of the bean.

flavored sugar vanilla bean seeds

  • Add the vanilla bean seeds to the sugar and mix well.

flavored sugar mixing

  • Put a piece of the vanilla bean pod in the bottom of the jar and add flavored sugar to the top.

flavored sugar filling jars

  • Store in an airtight container.

Notes

  • I purchased my jars at Hobby Lobby during their 50% off glassware sale this weekend. At full price, the jars are about $2.50. They are 3 1/4″ tall with a flip lid.
  • Two batches of sugar filled 18 jars. The jars hold a little less than 1/3 cup.
  • I printed Flavored Sugar Labels and tied the label to each jar with baker’s twine.
  • For a variation, mix 2 c. sugar with 1/4 c. whole cardamom seeds. Add the cardamom sugar to your daily cup of coffee.