Making MS Word Work

We did it. We wrapped up the research projects a few weeks ago (envision happy dance), and the papers even had a bibliography attached to each one.

Going through the notetaking and paper writing process with my 4th graders was a challenge. Getting them to format the papers correctly was excruciating. If your child is at an age where he is beginning to type documents for school, there are 6 word processing functions that I find make editing and publishing documents a whole lot easier.
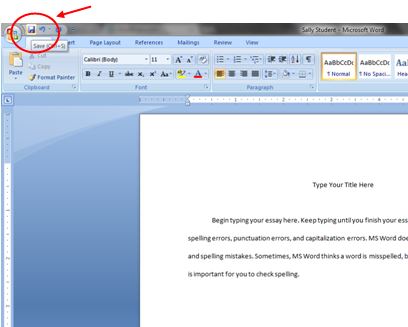
save as

Save As

Save As

  • Designate one folder where a student saves his documents all the time. My students have a dedicated computer they use in the classroom. There is a folder with their name on the desktop of their assigned computer. Every document a student types is saved into the same folder. Using the Save As feature, I show them how to navigate to their folder.
  • Parents, set up a folder for your child’s writing assignments ONLY on your home computer. Teach your child how to save in the same place every time.
  • I also recommend setting up a naming system. In my class, students always save documents as their name followed by key words from the project (TheRoomMom Barbie Research or TheRoomMom Aslan Essay).
select all

Select All

double space

Double Space

Double Space

  • Double space the entire document at one time. Students like to type a little, then play with formatting, then have mismatched spacing and fonts. After the entire document is finished, change the spacing at one time. I recommend the Select All function to highlight the entire document, then choose the double space (2.0) line spacing.
tab button

Tab

Tab Button

  • Always use the Tab button to indent when starting a paragraph. When students use the space bar, words are out of alignment and look messy. I dislike messy.

Ctrl+c (copy), Ctrl+x (cut), Ctrl+v (paste)

  • These are the 3 most valuable shortcut keys in my opinion. Rather than messing with right clicking which inevitably ends up de-highlighting text, I teach my students these 3 shortcuts. I also use these shortcut keys for copying, cutting, and pasting images.
formatting tool

Formatting Button

Formatting Button

  • This is a teacher’s best friend. If students have words jumping all over the page, turn on the formatting tool. It shows all the background buttons a student has pushed in the document. If a student pressed the space bar a thousand times to move something to the center, it shows little dots. If a student hit enter multiple times, a paragraph symbol (backwards looking P shows up). If a student hit  the tab button, an arrow appears. I can fix a lot of funky formatting in a student’s document by turning on the formatting key.
undo

Undo

Undo Typing

  • And finally, when all else fails, hit the counterclockwise arrow and undo the most recent typing!

What is your best keyboarding or formatting tip for students?

Blogging 101

fireworks

I hit a mini milestone at TheRoomMom last week. I have written 101 posts. When I started the blog 9 months ago, I had a list of about 20 ideas, so I am a little thrilled that I have put together 101 ideas, and I still have a few more in the hopper. As I look back, there are definitely some posts that resonate better than others.

carpool sign hanging

According to my stats, my most popular post is Carpool Etiquette. I also had my best day view-wise on the day I published the carpool rules. Why? I linked to a hilarious carpool post by HotMessMom, and she shared my link on her Facebook page. Wham! I had over 300 views in an hour. It gave me a small taste of what it would be like to have a Superblog.

american girl diy dessert

My most popular DIY post is the American Girl Buffet. It is also my most popular Pinterest referral. Obviously, I need to make more American Girl accessories. I am not sure Miss Priss can handle it.

Jedi Robe and Lightsaber 3

I was surprised that the Tonka Birthday Party was the most viewed party idea. I was sure it was going to be the Star Wars Sleepover.

Back to School Teacher Emergency Kit Contents

The best teacher gift idea is the Teacher Emergency Kit. This also happens to be my favorite gift idea, and I plan to re-post again every August right before school starts.

Teacher Speak is the highest rated parent/teacher post I have. I guess we all need tips for parent/teacher conferences.

Flotsam and Who's Driving

My most popular book list is the Picture Book post. My favorite book list is the Classic Re-Makes.

breakfast cup close up

It seems Breakfast Cups are the best snack food. I must say readers, you made a good choice there.

Here’s to TheRoomMom!

Teacher Appreciation Sirsee

DIY magnets

If you read my previous post about Teacher Appreciation Week, you know we organized a group gift of freezable meals for my daughter’s kindergarten teachers. We will be sending a little extra appreciation gift too. We made personalized magnets for the teacher’s white boards at school. I won’t lie to you; this little sirsee took some advanced planning.

I magnet things to the white board in my classroom all the time– attendance slips, papers without a student name, sample projects, just to name a few. I figured all teachers could use a good magnet. These little DIY magnets have a personalized thank you picture of the student, so the teachers will never forget the child– even if they try.

magnet supplies

Materials

  • scrapbook paper
  • clear glass stones or glass tiles (flat back)
  • Diamond Glaze
  • magnets (super strength)
  • photo address labels (pre-ordered)

Directions

  • A few weeks before you need the gift, make a sign that says “Thank You” and take a photo of your child holding the sign.

magnet thank you sign

  • I use Shutterfly, but any site with photo return address labels is fine. Order a sheet of return address labels with your “Thank You” photo in it. I have thought about other options for this, and I can’t come up with any. You need a tiny photo, and it needs to have permanent/sealed ink (like a sticker). I have tried printing my own photos on copy paper and photo paper, and the ink blurs when you use the Diamond Glaze. 

magnet labels

  • When the address labels arrive, cut the “Thank You” photo side away from the address label. I use a paper cutter and cut the photo so there is a small border around the edge. I tried to have a little thank you message printed in the address field thinking the whole sticker would fit under the stone– WRONG. Go ahead and print the photo with your real return address. If you use a paper cutter, the address side of the label is completely usable for any letters you mail. It’s kind of a two for one if you actually mail any letters.

magnet paper back

  • Put the stone on the scrapbook paper, flat side down, and trace a line around the edge. Cut out the shape of the stone and apply the “Thank You” photo sticker in the center of the scrapbook paper piece. My son squeezed a handwritten note onto the side of his magnet with the school year listed too.

magnet add sticker

  • Put a dot of Diamond Glaze in the center of the photo and press the flat side of the stone on top until the Diamond Glaze smooshes to the edge. Let dry. If the Diamond Glaze runs over, gently wipe with a damp paper towel. You may need to turn the stone upside down to let it dry.

magnet attach paper

  • Once the Diamond Glaze dries, put a small dot of Glaze on the back of the paper attached to the stone. Press the magnet into the center of the Glaze. Let dry completely. NOTE: You can’t have any run of the mill magnet for this job. You need super heavy duty magnet strength. The best part about these homemade magnets is the industrial strength pull. I found the super magnets at an art supply store, but I have seen them at my Ace hardware store and Michael’s Crafts. I like the small silver disc magnets, but I have also bought the black disc magnets.

super magnet

  • Instead of magnets, you could attach thumb tacks to the back with the Diamond Glaze and make a pushpin for the teacher’s bulletin board. I have also used these photo magnets as a gift for a grandparent, Mother’s Day, or Father’s Day.

finished magnet

Carpool Etiquette

carpool sign on dashboard

You know that really talented teacher who announces names in afternoon carpool? Well, I am that talented teacher at my school. I share the job with another teacher who used to be the caller full time. She is really good at it; I am but a humble apprentice. The veteran caller and the caller-in-training (me) switch off every grading period. That way, if one of us is absent, carpool still runs efficiently. I should mention that most teachers do not want this job. It is a fairly high pressure situation. If carpool does not go well, riots develop, mass hysteria; it can get ugly. With that in mind, be kind to the carpool caller.

Rule 1: Keep your sign in the window of your car ALL year round. When your child is not standing next to you, and you are wearing sunglasses, the carpool caller does not know your name or who you are.

Rule 2: Tip the sign up a little when you get within range of the carpool announcer. If it is sunny, and the light is reflecting off the windshield, we can’t read the sign resting on your dashboard. If it is raining, and the windshield is wet, we can’t read the sign resting on your dashboard. Basically, anything resting flat on the dashboard is hard to read.

My daughter’s school distributes tags that hang from the rearview mirror. You write names in Sharpie pen on them. They are easier to read from a distance. I am trying to convince my school to invest in them.

carpool sign hanging

Rule 3: No extraneous conversation of any kind. The only time you need to talk is to let the caller know who is riding in your car if you don’t have the sign in the windshield (refer back to Rule 1 and please put the sign back in your windshield). Don’t try to ask questions about homework or have a parent/teacher conference with the carpool caller or the loaders. I will admit I am a little guilty of this. I will make a quick comment to a parent, and then I lose track of the car order, and then I remember why I should not be talking to drivers.

The caller is counting cars. She/he can’t have a parent teacher conference and announce names at the same time. The loaders are trying to get children in seats as quickly as possible to move the whole line forward.

Rule 4: Stay in your assigned slot unless asked to move forward by a faculty member. If you hear the caller announce your child’s name at position 3, or the green cone, or whatever it is at your school, go to that position and wait. If the cars in positions 1 and 2 load and pull away, continue to wait at station 3 unless a teacher waves you forward. If you pull forward thinking you are making room for more cars, you reshuffle all of the students. I am The caller is still down the block calling numbers based on your number 3 position. Once students are lining up at the wrong carpool stations, it slows down the whole system.

Most of the time, the caller knows who you are. She/he does know who rides in your carpool. But just in case, and for the sake of all the families in carpool, use your sign with the student name, do not talk to anybody, do not talk on your cell phone, do not fill the loading side car seat with groceries or the younger sibling, do not get out of the car, do not pass go, and do not collect $200.

And, that is the way a teacher sees it. To read a totally hilarious carpool blog post from the parent’s perspective, visit this post. The Hot Mess Mom gets it! What are your carpool pet peeves? Everyone with school aged children has them.

Kindergarten Snack, Again

turkey wrap close

Miss Priss is slowly embracing TheRoomMom version of snack after she realized she wasn’t as hungry in the afternoon on our snack days. She requested turkey wraps for her class this rotation. Not only is it easy to make a basic wrap, but it can be a good school lunch option, and you can fill it with all kinds of meat, cheese, or veggies depending on the tastes of your child. I made extras tonight to take with me to school tomorrow to share with my co-teacher.

turkey wrap ingredients

Ingredients

  • large flour tortillas (I needed 2 packs of 10 tortillas)
  • 1 1/2 to 2 lbs. thinly sliced turkey
  • cream cheese, softened
  • shredded lettuce (optional)
  • grated carrots (optional)

assembling turkey wrap

Directions

  • Spread a thin layer of cream cheese on one side of a tortilla. Cover the entire surface.
  • Cover the cream cheese with a layer of turkey. I use 2-3 slices.
  • Near one edge of the tortilla, sprinkle a line of lettuce and grated carrot.
  • From the end with the lettuce and carrot, roll the tortilla.
  • Slice into 5 pieces. (I discard the ends– and by discard, I mean TheRoomDad eats them.)
  • Can be made the night before and refrigerated since they don’t get soggy!

turkey wraps sliced

For Adults

  • I like to spread the tortilla with Boursin or Alouette cheese and add additional thinly sliced veggies like red pepper.
  • Hummus makes a good spread too instead of the cream cheese.

I am also sending in bags of pretzels because I think this snack may be too “weird” for some kindergarteners. We did make half of the wraps with cream cheese and turkey only, so I am hoping all of the kids might give it a try. What are other good wrap combinations for children or adults?

turkey wraps tupperware