Flavored Popcorn Salts Gift Idea

It’s the time of year where I like to send a small thank you to all the teachers, coaches, and other caring adults who work with my children. It adds up to more than 20 little gifts, so I am always looking for something that I can make in bulk AND will be something that the receiver might use.  I typically go for something consumable meaning the gift receiver can eat the item, or it has a one time use and then is gone.

This year, I made flavored popcorn salts. There are many recipes available and lots of cute ways to package the salts to give as a gift. I found containers that look like French fry boxes at Hobby Lobby. I put one package of microwave popcorn in each container along with a variety of mini bags of flavored salts. Even if our teacher friends don’t use the salts, most people I know will eat popcorn, and it is something that can be a good snack to make at school (although you have to be careful not to pop in a central location because the smell does linger!).

We gave a mix of 3 salt flavors– Bacon Parmesan, Buffalo Ranch, and Mexican Hot Chocolate (my favorite). I read through a handful of recipes by doing a Pinterest search and then clicking through to the websites. I used recipe ideas from THIS WEBSITE and THIS ONE. For our popcorn packets, I bought “light” microwave popcorn because that type usually has the lightest amount of salt and butter flavor. You need the least amount of salt and butter as possible to start because the flavored salts are SALTY, so use sparingly. Of course, you could always pop your own popcorn from scratch and control the salt amounts that way.

I printed THESE LABELS for the mini bags. I used my favorite 3″ x 5″ bead bags that I get from Michael’s Crafts and Avery labels 8160, size 1″ x 2 5/8″.

The salts can be sprinkled on meat, eggs, or anything to which you would normally add salt. Based on the few blog posts I read, it is really easy to create new combinations so think about flavors you enjoy and start mixing! If you want to take this idea and make the gift a little more substantial, add a movie gift card for your local theatre or a gift card for Redbox.

Greek Salad

I live in South Carolina where the weather changed from almost uncomfortably warm to hot and humid some time last week. During the oppressive heat season, the only foods that appeal to me are fresh and crunchy and light. As a result, we have been eating variations of a Greek salad quite a bit lately.

The reason I love the Greek salad so much is because of the dressing. When you search Greek salad dressing recipes, there are many options. I took a few recipes that were similar and combined parts using the herb combination I liked best. The finished dressing is tart and tastes great with steak or chicken. If you are looking for a light summer meal, put together a chopped Greek salad. Leave the dressing off and make some individual portions to bring to school or the office for your teacher or work lunch. Add the dressing when you are ready to eat.

Dressing Ingredients

  • 2 fresh garlic cloves, minced
  • ~1 t. salt (or to taste)
  • 1/2 t. freshly ground pepper
  • 1 t. Dijon mustard
  • 1/2 c. olive oil
  • 2 T. fresh lemon juice
  • 5 T. red wine vinegar
  • 1/2 t. dried basil leaves
  • 1 t. dried oregano leaves

Salad Ingredients

  • Romaine lettuce, chopped (enough for people you will be serving)
  • peeled cucumber, seeded and chopped
  • grape tomatoes halved or quartered
  • thinly sliced purple onion
  • crumbled feta cheese
  • grilled steak or chicken, thinly sliced
  • pita chips

Directions

  • Mix together dressing ingredients and shake in a jar or use a whisk to combine. Set aside.
  • Put chopped lettuce in a serving bowl. Top with cucumbers, tomatoes, and purple onion.
  • Mix salad dressing again if it has separated and pour over salad. Toss well until ingredients are covered evenly with dressing.
  • Sprinkle feta crumbles on top.
  • Serve with sliced meat and pita chips.

Notes

  • Other ingredients you could add are calamata olives or mild banana peppers.
  • I like my lettuce chopped into small pieces because I think it tastes better that way. The dressing really covers well.
  • This makes a great teacher lunch. Assemble in individually sized tupperware with the dressing on the side. Pour the dressing over when ready to serve, put the lid on firmly, and shake.

For more great salad options, read about my favorite FRIED CHICKEN SALAD or TACO SALAD.

Mini Cakes and Breads

mini-pound-cake-gifts

We have science fair and Valentine’s Day on the calendar this month. A trip to Michael’s Crafts was inevitable. We hit the store yesterday, and after we completed our lap through all of the craft and school supply aisles, a small end cap display with Valentine baking supplies happened to catch my eye. Mini paper loaf pans– with hearts! Does it get any better? Mini + baking + holiday craft all in one.

mini-loaf-pans-package

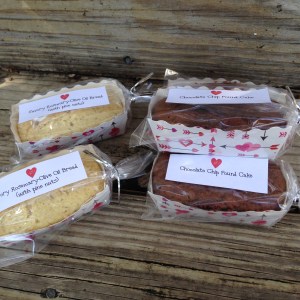
I bought the last two bags of mini loaf pans and immediately came home to make small breads and cakes. I baked this Savory Rosemary and Pine Nut Bread in 12 of the pans and a “faux” chocolate chip pound cake in the other 12 pans I had (recipe below).

mini-bread-and-cake-gifts

We wrapped the mini loaves in 3″ x 4″ clear plastic treat bags and used a twist tie to close. I printed labels for the bags with a small heart motif, and we will be delivering these little treats to my children’s teachers for Valentine’s Day. They make a great teacher gift because they are a single serving and are easy for little people to carry to school and deliver.

mini-cake-size

Chocolate Chip Pound Cake

Ingredients

  • 1 box yellow cake mix
  • 1 small box instant vanilla pudding
  • 1 small box instant chocolate pudding
  • 4 eggs
  • 1 1/2 c. water
  • 1/2 c. vegetable oil
  • 6 oz. chocolate chips

mini-cakes-ingredients

Directions

  • Stir cake mix and pudding mixes together in a large bowl.
  • Add eggs, oil, and water. Beat by hand until smooth.
  • Stir in chocolate chips. You can coat the chocolate chips with about 1/2 T. flour before adding to the batter to keep them from sinking to the bottom during baking. If you are making mini sized cakes, use mini chocolate chips.
  • Pour into a greased and floured bundt pan. If you are using the mini paper loaf pans, you do not need to grease or flour the pans. You will fill the mini pans about halfway.
  • Bake 1 hour at 350 degrees or until a skewer inserted in the center comes out clean. If baking the mini size, reduce baking time to ~30 minutes.
  • Cool 20 minutes and remove from pan. If using the mini pans, leave in the paper pans.

mini-cakes-filling-loaf-pans

Notes

  • The mini paper loaf pans can bake in a temperature up to 400 degrees. They do not need to be greased. To get your bread or cake out of the little pan, you unstick the corners and pull the sides away when serving.

mini-cake-side-view

Homemade Cheezits (kind of)

cheese-crackers-gift-bags-front-and-back-2

It’s holiday teacher gift season! I love teacher gift ideas, and I try not to repeat too many ideas from year to year. If I were not a teacher and a parent, I would not take the teacher gift situation so seriously, but I know how much I appreciate getting a small thank you from a student or family at the holidays, so I try to do the same for my children’s teachers. At the holidays, I often receive lots of home baked sweet goodies (no complaints here). Because there might be lots of cookies and candies on the way, I thought I would go the savory route for this year’s teacher gifts.

cheese-crackers-close

The crackers look like a Cheezit and have a similar taste but are slightly more gourmet due to the rosemary. I found THIS RECIPE via Pinterest. The recipe is easy to follow, but it is time consuming since you need to mix the dough, let it rest in the refrigerator, roll out the dough, cut, and bake. I put about 2/3 cup of crackers in each gift bag and ended up making three batches of dough to have enough crackers (twelve teachers).

cheese-crackers-cutting-shapes

In order to make my cuts even for the cracker shape, I cut a strip of cardstock paper one inch wide and used that as a guideline for cutting. I had straggly edge pieces that were not perfect shapes, and those were the pieces we ate at my house!

cheese-crackers-gift-bags

I printed labels on Avery 8163 shipping labels (2″ x 4″). You could use this ROSEMARY CHEESE CRACKER LABEL template and print on regular paper, cut, and tie to the bags with curly ribbon. The crackers would also be pretty in pint Mason jars or small, decorative Chinese food container boxes.

cheese-crackers-cooling

I am hoping the teachers receiving these little gift bags will enjoy this snacky treat. For our teachers who we know are dog owners, we are giving these DOG TREAT GIFT BAGS in place of the human treat. It saved me having to make even more batches of crackers!

cheese-crackers-gift-bags-front-and-back


Homemade Dog Treats

dog-biscuits-christmas-treat

This year, Miss Priss and Mr. Star Wars have several teachers who are dog owners. It gave me a little inspiration for a new teacher gift idea for the holidays. We got out a dog biscuit cookbook and tried out a few organic dog food recipes. Most of the dog treats need to be refrigerated after baking, so we narrowed down our choices to two recipes that can be stored at room temperature when finished. (CLICK HERE to see the Bubba Rose Biscuit Company cookbook information.)

dog-biscuit-dough

We liked the recipes that made a dough that rolled out, so you could cut fun shaped dog treats. We used bone, fire hydrant, and squirrel cookie cutters. The dough is a little sticky at first, and we kneaded in a little extra flour to make it easier to work. We tried to roll the dough about 1/4″ thick, but if you have kids rolling out the dough, you might have some batches that are thicker. Increase the baking time if you have thicker biscuits. We watched until the biscuits were browned on the edges.

dog-biscuit-cookie-cutters

There are many dog treat recipes available online. You need to know if your dog has any food sensitivities, and the dog biscuits should never have chocolate, raisins, onions, and a few other items that are toxic to dogs. Many of the recipes I found had specialty flours (we used brown rice flour and oat flour), so check your pantry before starting. CLICK HERE for one recipe from the Bubba Rose people that is similar to the ones we made. Our cookbook said it is easy to swap out the “flavor” ingredients for something similar– it did not recommend replacing the flours. For example, if a recipe calls for cheddar cheese, you could replace with provolone. If a recipe calls for ground chicken, you could replace with ground turkey.

When we are putting together our gift boxes, we are making sure there is a mix of shapes in the gift box (or bag). We are also wrapping up a few gift boxes for our neighbors and friends who have family dogs.

dog-biscuits-in-a-bowl